Holding On
Labels: Digital Scrapbooking
A blog with a little bit of homeschooling, early childhood education ideas, photography, and faith.
Labels: Digital Scrapbooking
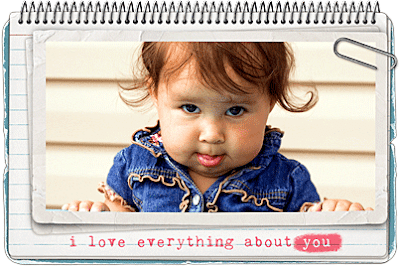 This started out as a Wordless Wednesday post, but I decided to add a quick little tutorial for those just starting to dabble with digital products. Sometimes just adding a simple element such as a frame, can really make a photo stand out. Here's how:
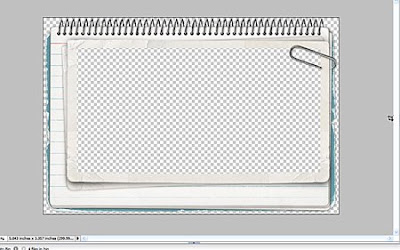 Open a digital frame. I used Carded Stacked Frames No. 3 by Katie Pertiet
 Use the rectangular marquee tool to select a rectangle slightly larger than the opening of the picture frame.Make sure the new layer is highlighted/targeted (it will be blue in the layers palette)
 Use the fill tool[K] (the bucket icon) and fill this selection. You have just created a clipping mask.
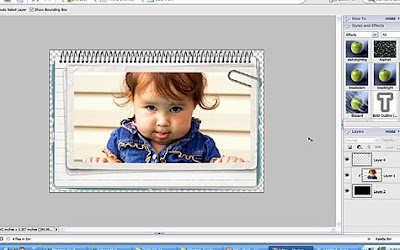 Now drag your photo above your layer mask (see those 3 little pictures to the right--that is the layers palette. You can see that my photo is above the clipping mask but under the frame). Resize your photo as necessary, and then clip it (CTRL-G in elements) to the mask you created. This will make your photo fit perfectly within the frame opening.
Labels: Designer Digitals, Digital Scrapbooking, How To's, Random Photos


Labels: lapbooking, printables, toddler time, Workbox

Labels: Designer Digitals, Digital Scrapbooking

 File Folder Game
 Another way I plan to give back is by joining The Big Curriculum Clean-OUT that Homeschool Creations is hosting. From August 2 - August 15 I will have several curriculum give-aways on my blog, and Homeschool Creations will have the master list of all blogs participating. I have been cleaning my shelves and have found that I have either duplicates of some items or items in good condition that I would like to pass on to others. I know for sure that I'll have something from All About Spelling, Sonlight and SpellQuizzer. I'm still going through my stash so I might have a few more things posted as well.

Labels: lapbooking, printables, unit studies

Labels: Designer Digitals, Digital Scrapbooking
 This is one of my favorite baby photos that I took of my dd#3. I love the curled toes and the little creases in the bottom of her feet. Oh babies grow so fast!
Labels: I ♥ Faces

Since I'm all about doing things as easy as possible, I used the Year In Review template from Katie Pertiet to form the background. I turned off all the calendar and word layers, and then shrunk the frames. I tell you that saved me several hours of work! :) Next I layered papers from Mindy Terasawa's In A Whistle Kit. I think it turned out cute---and it was affordable too! I can't wait to frame it.
Labels: Designer Digitals, Digital Scrapbooking

Go to Insert>Picture>From File ---then go to where you saved the flashcard template. This should insert the template as the background of your document. You will notice that the image is active when you see green squares (or "handles") around the image. In order to deactivate the photo, click toward the end of the document. You should get the text prompt(flashing vertical line).
Now repeat the process adding in the graphics on the left side of the template:
Insert>Picture>From File --- whatever graphic you've saved.jpeg
This graphic should be on top of the template image. You can move it to the appropriate square by right-clicking on your mouse and dragging the image. If the image needs to be resized, click shift and drag one of the corner handles (green boxes) either in or out (depending if you want the graphic bigger or smaller).
Once you have all the graphics in place, you can add text using the Fontworks Gallery toolbar.
Click on the T image (see arrow in the image above) Move the text tool cursor to the area in the document that you want to create text, and click and drag to make a text box. It is active when you see the flashing horizontal line in the text box.
 If you click the text box, you will notice blue squares (handles) all around it. You can click and move the text box when it is in this state. Click off toward the side or bottom of the document if you want to deactivate the text box. If you want to edit an existing text box, double click on it.
You can change the font, color, alignment on the text toolbar. Just highlight your text and make your changes. You are done! Don't forget to save. OpenOffice has the ability to save as a PDF too. Just click the PDF icon on the top toolbar.
Tip:
If you are having problems moving a smaller graphic, make sure the large background graphic is not active (green boxes around it).
See Other Related Posts:
Under the Sea Flashcards
Barn Yard Magnet Set
---------------------------------------
The cute dinosaur graphics are by Mindy Terasawa, www.designerdigitals.com
Labels: Computer Crafts, flashcards, How To's, OpenOffice
 I've been organizing and rearranging our school supplies in order to get ready to start a new school year. I was working on DD#3's stuff and wanted to create a few more things for her workboxes. She has quite a few puzzles, but was lacking some easy games. I thought she'd enjoy a memory/flashcard game.
 She had never played Memory before. She enjoyed flipping all the cards over and finding the matching pairs. She did not quite grasp the rule of only flipping over two cards at a time and if they didn't match, turning them back over again. She wanted to do it her way, so I let her. :) I was surprised at how long she played. I only did 6 cards so that she would not be overwhelmed. I'll switch them out with other sea creature cards when she needs a variety or more of a challenge.

 While I can't give a link to these flashcards due to copyright issues, I can give you a link to a template so that you can make your own set of custom flashcards. I've even created a short tutorial on how to make these cards using Open Office. Click here for the tutorial.
 Option 3: If you really want a PSD file, email me via the contact button on the sidebar.
Labels: Computer Crafts, Designer Digitals, flashcards, toddler time, Workbox
 I have to admit that I had to go to my archives to find a sports photo. Besides hating to take holiday photos, I guess I also don't like sport photography either. Considering we usually have several kids in different sports at one time, you'd think I'd have a ton of photos! I don't. My excuse is that I don't have a 300mm lens :)
Labels: I ♥ Faces
 Ok, don't laugh at the huge amount of produce in my first harvest, but it's baby steps for me! :) As I wrote before, I just set up my first Square Foot Garden this year. I started out small because I had to see if I could really handle caring for a garden. I have to tell you that I have loved having this garden! All I have to do is water it occasionally. I have had to do hardly any weeding at all! It has been so simple to care for--and so far everything is still living! :)
Labels: Square Foot Garden


After finishing book 1, I was pleased with the results. My struggling speller was spelling and reading!(thanks to the combination of AAS and the Beehive Reader), and I was pleasantly surprised to see the other two gain confidence with their spelling.
So if you are looking for a new spelling curriculum, I would highly recommend All About Spelling. If you are currently using AAS, don't forget that AAS Level 5 is now out. If you would like to know more, there is a helpful community called the ChatterBee that can answer any questions you might have.

Labels: curriculum
 __________________________
Labels: Designer Digitals, Digital Scrapbooking
 DD#3 has decided that she will no longer look at the camera when it's out. She's also decided that she does not want to take naps nor does she want anyone to do anything for her--she thinks she's big enough to do it herself. :)
 So off she'd run in one direction and then another. I swear she was doing this to me on purpose and enjoying it :)
Labels: Random Photos
 For the past several years, we have met my family in a neighboring town to watch the 4th of July parade. Continuing this tradition,we met again even though it seemed like it was going to rain. Thankfully, one resourceful member of our family brought a canopy just in case. :)
 Since we arrived at the parade a whole hour early in order to get "good" seats, we needed to keep the kids entertained. DD#3 had fun putting jewel stickers all over her face, arms and legs. (She even went to church the next day with them all on-lol!)
 Aww, isn't this the saddest/cutest face ever? This was DD#4's first time at a 4th of July parade. Since I am her mom, I know what she was trying to tell me with those pleading eyes. "Mom, get me away from these people! Pick me up please!" Of course I snapped the picture and then picked her up. :)
 Labels: Random Photos