Wednesday, December 21, 2011

Scratch and Sniff Ornaments

As I expected, my little girls have loved smelling the stickers in The Sweet Smell of Christmas book. I remember doing the same thing when I was a kid. I thought it would be a great idea to mix the scratch-and-sniff idea along with our Names of Jesus advent chain study. So I gathered supplies so that we could make our own scratch-and-sniff Names of Jesus ornaments to put on our tree. I thought this would be a wonderful way to remember all the names of  Jesus we have learned during this month while also being a keepsake.

Supplies:
Names of Jesus ornaments printables from Bible Story Printables
Various flavor packets of Kool-Aid
small containers
paintbrushes
scissors
ribbon


Mix each packet of Kool-Aid with 2 TBS of water and stir. Print out your ornaments on cardstock or watercolor paper.


All of my kids---ages 13-3yrs. old enjoyed this project. The Kool-Aid paint works just like watercolors. 
The kids took their time and even experimented with mixing colors. After the pages were dry, we cut them out and tied string through the top to hang on the tree.


They turned out beautifully! When we scratched them, we could get a faint smell. So it doesn't work as well as the scratch-and-sniff stickers, but it was sure fun to paint with Kool-Aid!

Labels: , ,

Saturday, November 5, 2011

I’m Thankful (craft project)

Am I the only one who can’t believe it is already November? For once though, I actually have Thanksgiving decorations up before Thanksgiving!

bannerpizza
Can you guess what my son is thankful for? :) We turned this piece into a Thanksgiving banner. You can find the template and directions over at my post on The Homeschool Village today.

Labels: , ,

Tuesday, October 4, 2011

Elephant Handprint Craft

My almost 5-year old has a couple other teachers besides me. In our homeschool co-op, her class has been rowing Mirette on the High Wire and she has also been learning about the circus in her speech class. Today she came home with the cutest elephant craft (thanks Mrs. B.!), which fits perfectly into all her circus-themed learning.

elephanthandprint

Trace hand onto grey cardstock. Cut out a half-circle out of cardstock and fold a flap to glue to the hand. Cut out a piece of red felt to go behind the ear. Tape a small piece of grey yarn for the tail. Add the details and you have a circus elephant!

Disclosure: There are affiliate links in the post. Thanks in advance for supporting this site!

Labels: , ,

Thursday, September 8, 2011

Open-Ended Crafts

afacecraft

One thing I have been working on is having craft supplies accessible yet contained (so the baby can’t get them). After reading Playful Learning, I was inspired and challenged to do a better job at having art supplies accessible.

13487668

Of course since I do have young children I have to have the materials contained (i.e. not in a center), but I have found that using plastic shoe boxes with the snap-top handle that swings up and down to close (how’s that for a description!) are easy enough for my preschooler to open but hard enough for my 11 mo. to pry open.  I’ve been leaving a couple of the supply boxes on a shelf (that way not everything is accessible at the same time—I am still controlling it a bit) that my preschooler can reach. I didn’t even say anything about them and the next day I found Mr. Smiley sitting on the table.

afacecraft

This made me smile. Right after that my 3yr. old came along with her pair of scissors and cut it all up. Ahh, the nature of crafts in my house. It’s the process that counts—right? :)

How do you store your craft supplies? Do you have a set-up that allows open-ended craft creating? I’d love to see some ideas, as I’m still tweaking how I’d like this to work in my house.

If you are interested in learning about creating Playful Spaces in your home, you might check out Playful Learning’s e-course. I’m looking forward to gleaning lots of good ideas from the class.

Labels: , ,

Monday, August 1, 2011

Octopus Craft Plus Giveaway

octopuscraftsupplies6
Isn’t this the cutest octopus?  I wish I could claim this cool design as my own, but I’m not that creative! I found this craft kit at Joann’s Fabric.

octopuscraftsupplies
When you first open the kit you’ll find all of these objects. What I like is that the majority of the pieces already have adhesive on them. You will need some glue or glue dots for a couple of the pieces though.

octopuscraftsupplies2
Sort the pieces into 4 piles, large circles, medium circles, small circles, and purple arms.
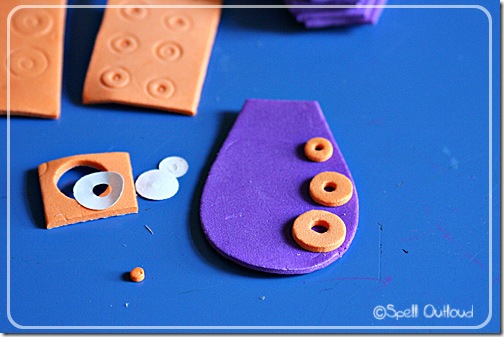
octopuscraftsupplies3
Add the circles down one side of the arm. I used the tip of a pencil to push out the center of each circle.

octopuscraftsupplies5
Next add the purple band (it has adhesive on it already). Then add some glue in each slit. If I were to do this again, I would smoosh a glue dot in there, place the purple arm and then add some glue.

octopuscraftsupplies4
I added the inside purple piece that I had to punch out back on top of the arm for additional strength. Adding the arms is not going to be easy for young children. An adult will have to do it.

starfish
While I was fiddling with the octopus arms, my preschooler worked on a starfish. The body is cut out of craft foam. Pom poms are glued on for texture. It made a nice counting activity too.

octopuscraftsupplies6
After all the arms are on, add the eyes and the mouth. You end up with a cute treasure tin.

octopuscards
It is perfect for adding little things like letter o objects to be sorted, pom poms for patterning, sea shells, and other little things. I made a set of color matching cards for my toddler. I think it would make a cute center or workbox activity.

I know you want one too, don’t you? Well…

Last year one of my favorite giveaways were craft supplies to do with children. I know that I am more likely to do a craft with my children if I already have the supplies on hand. For that reason, I try to keep my craft-stash up-to-date (which is needing updating badly!) So when Michelle from Best Toys for Toddlers asked bloggers to join in a Crafty Kits 4 Kids Giveaway Event, I jumped on board! There are 14 blogs each offering a different crafty giveaway. You can go to each blog and enter for each giveaway separately.

Can you guess what I’m giving away?

octopusstarfish
I’m giving away all the supplies needed to make these two crafts plus whatever other sea creatures you can think to make out of craft foam! (You might check out the sea horse craft for another ocean craft idea.)

The winner will get:
1 octopus tin/fun foam craft
1 pack of 5 1/2 in. x 8 1/2 in. fun foam (not pictured)
1 package of Glue Dots (not pictured)
1 package of Google eyes (not pictured)
1 package of pom poms (not pictured)

The Details:
Mandatory Entry: What would you put in the octopus tin?
*Giveaway runs from Aug. 1st – August 13th.
*Open WORLDWIDE. 
*Winner will be drawn by random.org and announced on this blog as well as emailed. *Winner will have 48 hours to respond or a new winner will be drawn.
*Please leave your email address in a comment or visible on your profile.

Yes, this is a very, very, long post. So for those of you who have read all the way down to the bottom, feel free to download your own octopus color cards:

Labels: , ,

Monday, June 6, 2011

A Cool Ice Cream Craft

Here’s a cool, summer craft for kids that goes perfectly with an ice-cream themed unit. Using colored ice-cubes, children paint a one-of-a-kind watercolor ice-cream cone.

icecubepainting1

Supplies:

Food coloring
Ice-cube tray
Tooth-picks or small craft sticks
water color paper (or heavy cardstock)
Ice-cream cone template

Directions:

1. First fill an ice-cube tray with water. Drop food-coloring in each compartment. Wrap with foil and then stick toothpicks through the foil (this hold the toothpicks up until the water is frozen.)

icecubepainting2

2. Have your child pick a cube and start “painting” on their paper.

icecubepainting3

Have them experiment with running the cube over other colors. What happens?

icecubepainting4

3. For a fun effect you can sprinkle some salt onto the wet paper. Once the paper is dry, cut out and glue onto a background piece of cardstock.

Extensions:

Have your child name the flavor of their ice-cream art. What does it taste like?

Cool, Customized Ice-Cream Art!

Project tips: We used watercolor paper and loved the results. I had to cut it down to 8.5 x 11. It is pretty thick so some printers might not like it.

Labels: , ,

Sunday, May 22, 2011

Princess Craft

princesscraft

Since I knew that Totally Tots was doing a Princess and Knights theme for this month, when I spied these craft kits at the Target Dollar Spot, I knew we’d find a good use for them.

princesscraft1 
One day this week I needed my 2yr. old and 4yr. old occupied while I took care of other things. My 12yr. old daughter agreed to help me out and did these crafts with the girls.

princesscraft2
It took patience for my 2yr. old to get the slots in right—but she did it. Her big sister was there to help with the other sides.

princesscraft3
The 4yr. old worked on putting her craft together too.

princesscraft4
Once they were done the girls had their own little princess play set.

princesspuzzle
And since we were talking about princesses, it was the perfect opportunity to bring out our Melissa & Doug Princess Puzzle.   

I just want to tell you how awesome my 12yr. old dd is. She took all these pictures for me since she knew I’d want to blog about it! How thoughtful! She did a great job!

Tot School

Labels: ,

Saturday, April 16, 2011

Salt Dough Necklaces

After reading the book Immi’s Gift with my girls, I immediately thought of a craft that we could do as a book extension. We would create our own necklaces, just like in the book. Using salt dough and cookie cutters, my toddler, preschooler, and elementary-age daughters made their own unique craft creations.

saltdoughnecklace1

First we mixed together all the ingredients for our dough. I used the recipe in Jimmie’s Salt Dough Map article. I cut the recipe in half though.

saltdoughnecklace1a

Then the girls practiced rolling out the dough. We do have child-size rolling pins, but they wanted to use the big one.

saltdoughnecklace2

Then they used cookie cutters to cut out some of the shapes we saw in the book, Immi’s Igloo. We placed the cut-outs onto a cookie sheet. Then we used a straw to cut out a hole in each figure. I placed it in the oven at 200 degrees to dry for several hours. You could let it dry over-night on the counter too.

saltdoughnecklacepaint saltdoughnecklacepaint2

After the cut-outs were dry, the girls painted them.

saltdoughnecklace3 saltdoughnecklace4

We placed them on a string and added some fabric flowers. A fun craft for all ages.

Immisgiftbook

Labels: ,