Blast from the Past
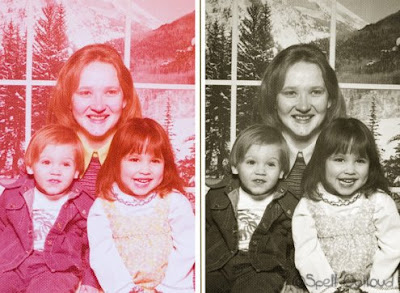
 Today we celebrated my mom's 60th birthday, which meant last night I stayed up late finding photos to display at her party. :) I knew that many of my photos were starting to fade, but several I noticed that if I didn't save them soon, they would be gone. The photo of my mom, brother and I was one of them. As you can tell, it is really pink. There are several ways to go about saving a fading photo:
1. Scan the photo at 300 dpi. Open up a photo-editing program and convert to black and white. Crop if necessary and then save.
2. Take a photo of the photo. Yep, that's what I did. My scanner is buried under papers right now, and since I do most of my work on my laptop, I would have to bring my laptop over to the scanner (well clean off the scanner first) and plug the scanner into my laptop---way too much work for a last-minute project. So taking a picture was the easiest route to go. There is a technique for doing this though. You want to shoot in natural light and not use a flash, and you need to be directly over the photo shooting down. I placed the photo on the floor and snapped the photo.
I use Photoshop Elements, and since fading was the issue, I took the easy route and converted it to black and white. I messed with the levels and did an overlay using "multiply" in order to bring out some of the faded details. You could also convert the faded photo back to the original colors, but that seemed like too much work and the black and white looked good. :)
If all that sounded too complicated--just ignore it :) But I do encourage you to look through some of your old photos and see if any need saving. And for extra points, I dare you to journal about what you remember about the photo. More often it isn't the photos that fade, but the stories behind them.
~Maureen
P.S. -- My friend Cassie has a great tutorial to walk you through saving photos that might have scratches and tears. Besides being a great reference and resource--it is on sale this weekend :) Click the photo for details.

Labels: Designer Digitals, Digital Scrapbooking, Random Photos


3 Comments:
Great job you did saving that photo! Stopping by from the MBC 100's to follow and say hello :)
Hello - Just wanted to say "Hello" from the Under 100 Club. Very nice site!
Hi, I'm visiting from Follow Me Club 1. Great blog.
Post a Comment
Thanks for letting me know you were here! :) I appreciate you taking the time to write. If you have any questions, I'll try to answer it in the comments section here or via email if it is listed in your profile.
Subscribe to Post Comments [Atom]
<< Home