Tuesday, March 30, 2010

Spring Toddler/Preschool Ideas


The Itty-Bitty Bookworm has a new e-zine available this month on flowers, frogs & turtles, Mother's Day, Memorial Day and Earth Day.  The e-zine has book ideas plus crafts/activities to go along with each topic. I was happy to be a contributor for the turtle unit. The e-zine is $10.00 and is full of wonderful ideas and printables. The Itty-Bitty Bookworm has a free sample of the e-zine, so head to the site to check it out.

Labels:

Monday, March 29, 2010

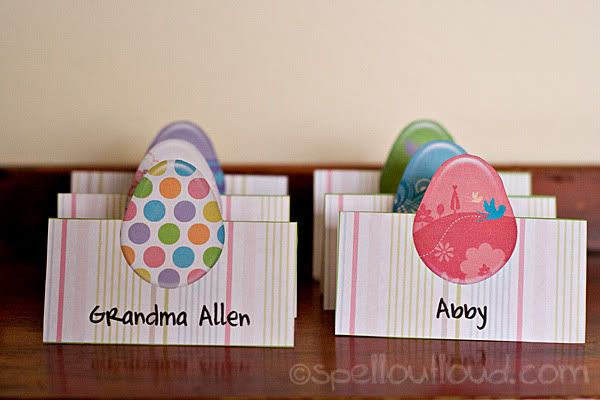
Easter Egg Place-Holders:Tutorial

Since I'm hosting Easter at my house this year, I thought having Easter place holders would be a fun way to decorate the table. These pop-up egg cards look great and really didn't take much time to make. Here's how I created them: (I use Photoshop Elements 6.0 on a PC-- some commands might be different in other versions or on Macs.)

1. Open up a new 8 1/2 x 11 document at 300dpi.

2. Use the rectangle marquee tool. I set mine as a fixed size: 3in. by 1.5in.

3. On a new layer add a stroke to the outside of the rectangle (in PSE Edit--Stroke--5pixels outside)


4. You should now have one rectangle. Duplicate this layer (CTRL-J) and line the top edges. The middle line will be the fold line for the name plate. At this point you can merge these two layers together.


5. Add papers or other decorations as desired. (Hint: I created a mask for the papers. I opened a new layer then highlighted the inside of the first rectangle with the magic wand tool (W). I then went back to the new layer and filled it with a solid color (bucket tool--K). I repeated with the second rectangle. That way I could clip papers to the mask and it would fit perfectly. This makes switching out papers a breeze.)

You can see how I clipped (CTRL-G) the Cheeky Time paper by Mindy Terasawa to the mask below.


6. Open up Egg Pebbles by Katie Pertiet. Place one image onto the place holder document. Position it so that half the egg is on the bottom rectangle and half is on the top.


7. Type the guest's name.

8. Fill the page up with as many name plates as possible. (Actually to make it easier for me, I open a new 8 1/2 x 11 document. Then I merge the layers of the finished place holder and drag it onto the new layer. Next I go back to the original document, undo the merge---ctrl z, change the name and the egg color and repeat.)

9. Print onto paper.

10. Using an Exacto-knife, cut the top portion of the egg out. Then fold on the middle line.

Labels: , ,

Melt in Your Mouth Muffins


Recently someone on the Sonlight boards wrote about a terrific muffin mix. Since my family likes to eat muffins for breakfast or a snack, I was interested in trying it out. The recipe makes a big mix that you can store in an air-tight container for several months. The best thing is that you can use this mix and then customize the flavors. Today I made banana chocolate chip muffins -----and they were awesome!  I can't wait to try other fruits and see how well it tastes. So thanks to Diane in TX for sharing this wonderful recipe!

MUFFIN MIX

8 c. all purpose flour
3 c. sugar
3 Tbsp. baking powder
2 tsp. salt
2 tsp. cinnamon
2 tsp. nutmeg

Combine all ingredients. Place in a large, airtight container. Store in a cool, dry place. Use within 6 to 8 months.

MELT-IN-YOUR-MOUTH MUFFINS

2 3/4 c. muffin mix
1 egg, beaten
1 c. milk
1/2 c. melted butter OR 1/2 c. vegetable oil

Preheat oven to 400 degrees; grease muffin pan.
Combine egg & milk in small bowl. Add all at once to mix. Stir until just moistened (batter should be lumpy).
Fill muffin pan.
Bake 18-20 minutes.

May add 1 c. dried fruit, diced peaches, blueberries, or 1/2 banana, 1/2 c. choc. chips

I sometimes make a coarse mixture of flour, sugar, and butter & sprinkle that over the tops before baking. That makes them seem more like bakery muffins. These are my family's favorite muffins.

Labels:

Saturday, March 27, 2010

All About Spelling Organization


We have been using All About Spelling for a couple years now and really love it. I wrote a post awhile ago about what we like about this spelling curriculum. You can read more about it: School Planning: All About Spelling.

One of the key components of this spelling curriculum are the letter tiles and the cards. Since we already have one big wall in our "school room" with a large magnetic dry-erase board, I purchased a medium magnetic dry-erase board to store all the extra tiles. When the kids are working, we can take down the extra tiles to get what we need. The whole alphabet is always up on the large dry-erase board. The kids do their tile-work on the big board. We've had the tiles for 2yrs. and haven't lost any yet! That is a huge accomplishment in our house ;)

Of course there are other options as well.  You can store the tiles by category in ziplock bags and then use a cookie tray to do the tile work.  You can read about how others store their tiles and cards at the Chatter Bee: Organization (I'm not sure if you have to sign-up to be able to read anything or not, but if you want tons of info. on AAS, the ChatterBee is where to find it)


Now for the key cards etc. I store each level in a 4x6 index card file box. Then I have all the levels that we are using plus the teacher's manual in a Sterilite cart (kind of a workbox system for myself) So when it is time to do spelling, I just go to my drawer and pull out what we need. This has worked great for me. I actually have all the subjects that I have to teach in their own drawer in this cart. Now I always know where my teacher manuals/books are located. This has saved me some serious time! :)


Labels:

Monday, March 22, 2010

My Favorite Digital Supply


If I had to pick one digital scrapbooking tool, I would pick my collection of brushes. Think of brushes as stamps on steroids---without the mess.  With brushes you can:


*Change the size of the brush
*Change the rotation of the brush
*Flip the brush
*Use any color or colors
*Use different blending modes for more effects
*Clip papers to the brushes
*Clip gradients to the brushes
*Use as elements on a page
*Use as titles
*Create custom backgrounds
*Use to customize fonts or titles
*Use to customize elements
*Great for many artsy-effects

On the layout above I used brushes to create a water-colored background with script flowers (both were brushes).  I added paint splatters for an artsy effect with 3 different paint splatter brushes. The best part was clean-up was so easy!

I love to use brushes to customize my papers. Here's how:


That little brush icon is what you need to click to access your brushes.


Pick the brush you want to use.


I used a brush by Mindy Terasawa called "Karissa Floral Brushes" You might notices that it is plain old black. You can change the colors by clicking on the foreground color picker.


Actually, I usually like to stamp in black and then clip a color to that layer (CTRL-G in PSE) Also, you will notice that I stamp each image on its own layer. That way I can move and adjust each stamp. (Click pictures for a bigger version)


You can mess around with the opacity, blending modes and more. So many options with just one set of brushes!


Unfortunately brushes cannot be used in all image-editing programs, so the next best thing if you don't have Photoshop or Photoshop Elements, are PNG files of the brush shapes. These file types have a transparent background and you can easily customize them.


Need some more examples on how to use brushes? Designer Digitals recently published an inspirational e-book called It's in the Brushwork. It is jammed-packed with wonderful ideas.


Have I totally confused you with brushes and you have no idea what I'm talking about? Laying It All Out No. 07 is a tutorial kit that teaches you how to load, resize and color in brushes. Lots of great information in there for all scrapping levels.


Reel Time Tips: Brush Tools Basics is a video lesson on using brushes. 
You will learn how to:
  • identify the brush tool in the Tools palette
  • identify the options available for a brush
  • select a brush shape
  • adjust the size of a brush
  • adjust the softness of a brush
  • rotate a brush
  • select a color for a brush
  • load a brush


So what is your favorite scrapbooking tool and why? I always love to read how others use different tools---traditional scrapbooking and digital.

Labels: ,

Friday, March 19, 2010

Busy Mom's Bible |Review


I've finally embraced the fact that there are seasons and stages in life, and during these times there are often different expectations and standards I have for myself. I had been taught at an early age that it is important to have a quiet time with God every morning in order to get my day started off right. In my mind, quiet time would be at least 50 min. long with Bible reading, meditation, and intercession, and done way before my household would wake up. Then came my reality---my season with having infants and young kids. I needed to change my expectations of myself and what I thought a good "Christian " quiet time should look like. It was hard to have a set time for myself with 5 kids also needing me. My Bible reading was often done sitting in the van waiting for piano lessons, baseball practice, or while nursing a little one. Usually I would grab a few minutes here and there to read the Word. I didn't have time to do formal Bible studies, but I still yearned for that in-depth study that I seemed to be missing in my 5 min. here-and-there reading. I needed something to help me focus and dig deeper in a limited time-frame.

Then, Zondervan recently sent me a copy of the Busy Mom's Bible. I was intrigued to see how their system worked. At first glance I was impressed with the beautiful Italian duo-tone pink cover--which makes it easy to keep track of in the piles of books and paper that seem to have over-run my house. I quickly glanced through the NIV Bible and noticed that there were 52 thought starters, or mini-devotionals printed on brightly colored paper throughout the Bible. That makes it very easy to find. Here are the details:

Specs:
*Retails around $24.99
*Thin-line NIV Bible
*Type Point Size: 8
*Size: 6.2 wide x 9.2 high x 1.4 deep in. | 157 wide x 234 high x deep 35 mm
*Weight: 1.655 lb
*8 maps included in the back
*Concordance
*Study Index
*Words of Christ in red

What I Thought:
I love the size and weight of the Bible. It fits perfectly in a diaper bag or large purse. The cover and pages seem well-constructed and hopefully will live up to lots of carting around. The main idea of this Bible is to allow moms to have a quality, focused few minutes with the Savior. This is exactly what I needed. Many times I would actually have a few minutes to sit and read my Bible, but I had no plan or direction. These thought starters allow me to study a topic by highlighting a focus verse, providing a short summary, and giving additional verses to look up that pertain to the topic. Some of the topics are:

*Family ties: blending families, transforming hearts, a secure place
*Raising Your Kids: vital discipline, discerning differences
*Your Relationships: influence and encouragement, restore your relationships

Most of the topics are subjects that moms today would be thinking about or could relate to.  The thought starters weren't preachy or too fluffy, but rather did a good job getting me to think about the topic. I liked that additional verses were included for more in-depth study if I wanted. I finally feel like I have some sort of direction when I pick up my Bible. For this season of my life, the Busy Mom's Bible is just what I needed. I highly recommend it.

Labels:

Wednesday, March 17, 2010

Family Traditions Notebook


Family traditions are what help bring families together and create special family bonds. Many times we focus on the big holidays such as Christmas, Thanksgiving and Easter, but we forget to create special celebrations for each month of the year. By having special occasions each month, you create opportunities for your family to be together, draw closer to each other and share the same memories. These special days do not need to be elaborate or costly, but it does take a commitment to carry through with the plan. For this reason, I created a Family Planner to help me keep track of the special traditions and events that I want to celebrate with my family this year.

I first shared some downloads during Christmas. You can get the cover and some planner pages:
Family Traditions- Christmas

I've added some Easter planning pages too:
Family Traditions - Easter

Here are some more celebration ideas:

* When the date and the month numbers are the same, have a special celebration (January 1, Feb. 2, March 3, April 4, etc.). You might make that date a special game night, movie night, craft night, pizza night or whatever you can dream up!

*Celebrate some of the silly holidays/observances for 2010:
January:
  • 19 Popcorn Day
February
  • 16 International Pancake Day
March
  • 14 Children's Craft Day
  • 18 Absolutely Incredible Kid Day
  • 26 Make Up Your Own Holiday
April
  • 10 Every Day is Earth Day
    12 D.rop E.verything A.nd R.ead Day
May
  • 1 Mother Goose day
  • 12 Limerick Day
  • 23 Neighbor Day
June
  • 15 Nature Photography Day
  • 25 LEON Day - LEON is NOEL spelled backwards. It is now six months until Christmas. Throw a snowman party in the summer.
July
  • 18 National Ice Cream Day
  • 24 Tell an Old Joke Day
August
  • 3 National Night Out
    18 Cupcake Day
September
October
  • 2 World Card-making Day
  • 31 National Knock-Knock Jokes Day
November
  • 3 Sandwich Day
  • 11 Guinness World Record Day
December
  • 17 Wright Brother's Day
  • 25 Christmas

 For even more ideas see Brownielocks's calendar.

Well this is what works for me and helps me try to intentionally plan some fun times for my family.  Click below to see even more Works for Me ideas.

Labels:

Saturday, March 13, 2010

The Wordless Book for Easter


The Wordless Book is a wonderful way to teach children (and adults) the good news of Jesus Christ.

Wordless book Cake

There are so many creative ways to share the story. We've done cakes, bracelets, booklets, gloves, found objects and more. I've gathered many ideas, links, and printables and presented them in a Squidoo article, The Wordless Book. I also added two new printable Wordless Books:


Please feel free to share these printables, but share the link to this post or the Wordless book article, not to the download. Thanks!

Directions:

1. Print the booklet out on paper.
2. Cut around the outside black border.
3. Fold in half length-wise (hot-dog fold)
4. Open paper back up and fold in half again (hamburger fold)
5. While still folded, cut on the dashed lines.
6. Open the page up again. Fold so that the page is going length-wise again. You will notice that the part you cute kind of forms a square. You will bring those ends in together so the edges meet.
7. Continue folding the pages so they are flat.

I hope this makes sense! I'll try to add visual steps soon.

For more Easter Ideas check out:

Labels: , ,

Tuesday, March 9, 2010

Recording Memories


I caught my youngest asleep on the arm of the couch the other day. While looking at her I just soaked up her chubby cheeks, cute little dimple on her chin and her fly-away hair. I know that soon enough she'll outgrow her baby looks and I want to remember those details.


This is the same little girl awake. Once you put her in her highchair, she is a totally ham! She loves to get the older kids laughing at her antics. Her cheesy smile can brighten our day in an instant. She's been such a joy.


Yesterday my 3yr. old and I were reading her story Bible together. We were reading about the Garden of Eden. On the page there was a picture of the garden with a river running through it. I asked her if she thought it would be fun to play there. She said, "Oh yes mom! Let's go get in the van and go there!" 

________
Layout supplies all by www.designerdigitals.com

Labels: ,

Sunday, March 7, 2010

Letter A: Toddler/Preschool Time

My 3yr. old has been a little out of sorts during the school day lately. Then it hit me---she was bored! I needed to do something a little more challenging for her, so she started "Letter Time" this week. Our letter of the week was A. Of course that seems obvious, but actually I picked it because I knew she already recognized the letter since it is a part of her name. I haven't decided if we'll go ahead and do all the letters in order or if I'll switch it up. We'll see.

Since I'm not one to reinvent the wheel (I don't have the time!), I purchased Erica's Letter of the Week Preschool Curriculum. She has printable activities plus a lesson plan for each letter of the alphabet.  My goal is to get all the activities printed, cut, laminated and put in large envelopes sorted by the letters. Then when I need it, all the resources will be together. As I said, it is my goal. It has not become reality yet--lol. Since we are still at the introductory phase with letters, I only printed a couple of activities that were included. I know that we will probably go through the alphabet at least one other time (w/ little sister in tow next year) so I"ll save some for then.

 
This activity was an size sort activity available in the download. My daughter put the ants in order from biggest to smallest and from smallest to biggest. Then we talked about the colors.


We used the letter sort mat. For more variety, we switched it up by hiding capital and small letter a's in a bowl of macaroni. She dug through the bowl and then placed the letter on the appropriate side of the mat. She really enjoyed this.
  

Here she sorted capital a's and small letter a's on the mat. These were the ants that were included in the download.
 
Next we did a letter A craft. I got this idea from Totally Tots, who got it from No Time For Flashcards.


Then on Friday our toddler/preschool co-op did apple activities which fit perfectly into our "Letter A" theme--- and this wasn't planned at all. The kids talked about the different colors of apples, read apple books, tasted apples and played an apple game---which they loved!

I blogged about an apple unit earlier in the year: Everything Apples and Apple Collage Craft


Mrs. S. came up with this adaption to the finger-play "Five Red Apples" She had red, green and yellow balloons in a pile on the floor. The children stood in a circle (well as close to a circle as 1, 2, 3, 4 & 5yr. olds can) and did the following poem. When their name was said, they got to "pick an apple" aka balloon from the floor. When everyone had an apple they had fun tossing them in the air. I think the kids played this game at least 4 times.

Five Red Apples
(or however many children there are in the group)

Five red apples hanging in a tree (Hold up five fingers)
The juiciest apples that you ever did see.
(Child's name) came by and wanted a treat (pick a balloon)
And one little apple was hers to eat.

For more preschool ideas check out:


Labels: ,

Wednesday, March 3, 2010

Math on my Mind

Math and I never were friends. In fact, math scared me. I wrote about my math feelings a couple months ago. I don't want my kids to feel the same way I felt about math. I want my kids to feel comfortable and maybe even a little excited to do math. So I've been trying to change things up a little in our house.

Right now my kids need to get their basic math facts down. We've been using games and flashcards to try to help.
 

I read about this math game idea in a book several years ago and finally got around to implementing it this year. All you need is an egg carton and two erasers (buttons, dried noodles, beans etc.)
 
 
Number the spaces in the carton. Place two erasers in the carton and shut the lid. Next shake the carton and open up. Then have your student add the two numbers or multiply the numbers where the erasers landed. I make my kids write the number sentence on paper or a dry erase board. Since this is different from our normal math stuff, the kids enjoy playing the game.


One of my kids was learning how to read large numbers and having some difficulty remembering the place value names. I used different colors to help differentiate between hundreds, thousands, millions. I made them into pockets and then wrote numbers on index cards. Each evening after dinner, the kids mix the numbers up and each have a turn reading the numbers. They've enjoyed practicing this way.


The last thing we've added to the math mix is a new game for the Nintendo DS. I guess when it's on the DS it just doesn't seem like work. I came across the Personal Math Trainer game and bought it knowing that I'd be able to get my kids to practice their facts via this route more than traditional flashcards. So far so good! The three older kids rotate which day they practice their facts on the DS. I usually give them a 15min. time limit but often find them still working past that. This isn't a fancy video game, but rather a tool to practice basic math facts using different drills.

So that's what's working for us right now. I'm still deciding which direction to go with our math curriculum for next year. If you have an math curriculum reviews or opinions, I'm open to hearing (umm reading) them.

Labels: